|
Above Ground Pools
Above Ground Pool Options
Landscape Design
Exclusive Features
Pool Installation
Inground Fiberglass Pools
Fiberglass Pool Information
Fiberglass Pool Installation
Pool Filters & More
Filters and Pumps
Pool Products
|
Above Ground Pool Installation
At Michigan Swim Pool we do offer above ground pool installation at affordable prices! We understand that your schedule may
be to busy or you just may feel like having the pros do it for you. Just give us a call at 269-345-4634 or complete the form above
and we will can give you a price estimate.
This is just one additional way we stand out as your full service pool store. Many pool sales locations just leave you high and dry. We can and
will help you every step of the way.
If you would like to install the pool your self the steps below are a good guide to getting your above ground pool installed.
These are only guide steps! Please see manufactures guidelines for proper installation. Install pool at your own risk.
- Mark your pool site and remove the grass.
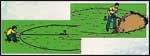 All grass has to be removed from the area beneath the pool and
all the way around the pool wall to make your assembly task easier and less prone to accidental wall damage such as dents.
Check local codes for your area.
All grass has to be removed from the area beneath the pool and
all the way around the pool wall to make your assembly task easier and less prone to accidental wall damage such as dents.
Check local codes for your area.
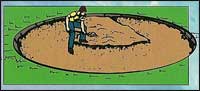
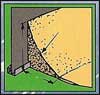
- Level Your pool area.
Once the grass is removed, the higher ground should be brought down to match the height of the lowest grade level. Digging out the high side is RECOMMENDED.
The only exception which would allow for a lower area to be raised up is if you supply a method for retaining the build up of the loose fill and properly compact the fill areas with machinery.
Hand tamping of raised fill areas will not be sufficient to prevent settling of the pool frame. This is due to the large amounts of water soon to be on the ground area.
Due to the extreme weight of the water on the ground, there exists an outward reaching pressure dispersal "cone" or "pyramid" that extends downward
through the ground which provides the needed support for the immense weight of the water above the ground.
This weight is dispersed at approximately 45 degree angles from the sides of the pool wall structure downward and into
the adjacent soil below. Too sharp a drop off when building up a low area will result in that side giving way to the
pressure being exerted on it. The pool will settle or sink noticeably to that side of the installation over time.
The minimum safe distance away from the pool wall you need to be in order to adequately retain the raised fill is dependent upon the
height of the fill and its composition, the type of material used as fill, and the slope of the ground adjacent to the pool site and raised area.
All of these things make it difficult to recommend the action of raising a site rather than digging it out.
There is a risk involved! Your pool is relying on you to use your best judgment given the site conditions you will encounter.
- Place the right amount of base material in pool area center.
 The smooth, debris free masonry sand beneath the liner will act as a necessary buffer between the
ground and the thin vinyl water tight membrane we call a pool liner. Enough material is needed
to supply a uniform 2" layer of washed, mason's, or yellow sand or a clean soft sand / clay mixture.
A good base will help to absorb rock, stone, animal, insect, or root movement caused by nature or
seasonal freeze / thaw ground conditions that occur.
You should place a nut grass killer liberally on top of the sand, wet it down thoroughly and then
tamp the sand firmly beginning at the outside
edge of the pool and working your ways towards the middle of the pool.
The smooth, debris free masonry sand beneath the liner will act as a necessary buffer between the
ground and the thin vinyl water tight membrane we call a pool liner. Enough material is needed
to supply a uniform 2" layer of washed, mason's, or yellow sand or a clean soft sand / clay mixture.
A good base will help to absorb rock, stone, animal, insect, or root movement caused by nature or
seasonal freeze / thaw ground conditions that occur.
You should place a nut grass killer liberally on top of the sand, wet it down thoroughly and then
tamp the sand firmly beginning at the outside
edge of the pool and working your ways towards the middle of the pool.
- Assemble Base Frame (bottom Rails and plate)
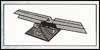 Most manufacturer's instructions call for the use of full sized patio stones or blocks as
levelers beneath the pool frame posts and buttresses. Jagged half blocks tend to induce settling.
Only the top of the patio block should be exposed and visible after you have completed setting the block in
place. Leaving block sides exposed leads to erosion from under pool.
All blocks should be leveled side to side and from front to back to ensure that the base plates,
track, and pool frame rest firmly and evenly on the block.
All blocks should also be no more than 1/16" out of level from one block to the next and no more than 1"
from one side or end of the pool to the other. Using a site leveling transit, it is possible to set each block
at exactly the same level in the ground around the perimeter. What you see through the scope is exactly what
you get when taking your measurements. This assumes that the scope is level, so confirm this as you take readings.
Out of level, from block to block, leads to out of round or "square". This leads to buckling of the wall
above the wall channel, or bottom track, at or behind the upright posts. This is observed when adjoining
blocks are only off from one another by 1/8".
It is for these reasons that a pool be built upon a solid and secure foundation and be as level as possible.
After you determine the actual position in the ground that the block needs to be placed, be sure all posts
will rest squarely and evenly on them.
Most manufacturer's instructions call for the use of full sized patio stones or blocks as
levelers beneath the pool frame posts and buttresses. Jagged half blocks tend to induce settling.
Only the top of the patio block should be exposed and visible after you have completed setting the block in
place. Leaving block sides exposed leads to erosion from under pool.
All blocks should be leveled side to side and from front to back to ensure that the base plates,
track, and pool frame rest firmly and evenly on the block.
All blocks should also be no more than 1/16" out of level from one block to the next and no more than 1"
from one side or end of the pool to the other. Using a site leveling transit, it is possible to set each block
at exactly the same level in the ground around the perimeter. What you see through the scope is exactly what
you get when taking your measurements. This assumes that the scope is level, so confirm this as you take readings.
Out of level, from block to block, leads to out of round or "square". This leads to buckling of the wall
above the wall channel, or bottom track, at or behind the upright posts. This is observed when adjoining
blocks are only off from one another by 1/8".
It is for these reasons that a pool be built upon a solid and secure foundation and be as level as possible.
After you determine the actual position in the ground that the block needs to be placed, be sure all posts
will rest squarely and evenly on them.
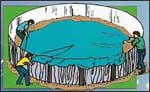
- Uncoil and install pool wall.
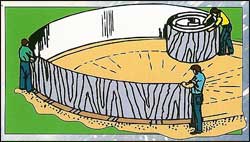 The most important aspect to wall assembly is to continually check and re-check
that the pool is perfectly round or "square" if it is an oval pool. This ensures that the pool posts will not
lean in or out noticeably as well as to make sure that the liner will fit properly. If a pool is out of round,
the liner will be stretched in ways it was not intended to be, and wrinkles will form that can not be removed
because they are caused by the stretching of the material itself. Dishing the bottom of your pool also causes
these wrinkles and is another reason to be sure your pool is perfectly in round. The wall should be set in place,
into the track, as you slowly unwind the wall around the perimeter of the pool. More people make this a
much easier task and having more help will also help prevent the wind from blowing the wall down. Connect wall
using nuts and bolts provided. The size of the bolts varies with the type of pool you have.
The most important aspect to wall assembly is to continually check and re-check
that the pool is perfectly round or "square" if it is an oval pool. This ensures that the pool posts will not
lean in or out noticeably as well as to make sure that the liner will fit properly. If a pool is out of round,
the liner will be stretched in ways it was not intended to be, and wrinkles will form that can not be removed
because they are caused by the stretching of the material itself. Dishing the bottom of your pool also causes
these wrinkles and is another reason to be sure your pool is perfectly in round. The wall should be set in place,
into the track, as you slowly unwind the wall around the perimeter of the pool. More people make this a
much easier task and having more help will also help prevent the wind from blowing the wall down. Connect wall
using nuts and bolts provided. The size of the bolts varies with the type of pool you have.
- Rake base material and build a cover for the liner.
 With this base material, you must also build around the inside perimeter
of your pool wall an even height, uniform beveled cove to avoid contact
between the edges and parts of the metal pool framework and the thin water tight membrane or pool liner.
Bevel the sand at a 45 degree angle with the top of the cove a minimum of 6" high,
as measured from the base of the pool wall and framework to the top of the angled cove.
Pack the sand with a 2 liter bottle pre-filled with water to help form the cove. Taper the cove material
downward and inward and blend it into the deep layer of base material that you have laid down
previously on top of the undisturbed soil of the site. If the cove is not made uniformly around
the pool, the fit of your liner will be affected. A suggested alternative to this
is using Styrofoam Pool Cove.
This base material as well as the cove area should be tamped as firmly and as evenly as possible to
minimize the occurrence of large depressions from walking around inside the pool during the liner
installation process.
With this base material, you must also build around the inside perimeter
of your pool wall an even height, uniform beveled cove to avoid contact
between the edges and parts of the metal pool framework and the thin water tight membrane or pool liner.
Bevel the sand at a 45 degree angle with the top of the cove a minimum of 6" high,
as measured from the base of the pool wall and framework to the top of the angled cove.
Pack the sand with a 2 liter bottle pre-filled with water to help form the cove. Taper the cove material
downward and inward and blend it into the deep layer of base material that you have laid down
previously on top of the undisturbed soil of the site. If the cove is not made uniformly around
the pool, the fit of your liner will be affected. A suggested alternative to this
is using Styrofoam Pool Cove.
This base material as well as the cove area should be tamped as firmly and as evenly as possible to
minimize the occurrence of large depressions from walking around inside the pool during the liner
installation process.
- Install pool liner.
 Try for an installation that is as wrinkle free as possible
but you can not overly stress a liner in an attempt to accomplish this feat of having absolutely no wrinkles.
Massive amounts of fold over wrinkles are not acceptable as they are not good for liners.
To avoid wrinkles with overlap liners, remove excess material as water is added. With beaded
liners, smooth the material out to the sides.
Proper fit and installation of a liner requires patience and diligence.
Try for an installation that is as wrinkle free as possible
but you can not overly stress a liner in an attempt to accomplish this feat of having absolutely no wrinkles.
Massive amounts of fold over wrinkles are not acceptable as they are not good for liners.
To avoid wrinkles with overlap liners, remove excess material as water is added. With beaded
liners, smooth the material out to the sides.
Proper fit and installation of a liner requires patience and diligence.
- Assemble pool upright's and attach to base frame.
Follow the manufacturer's instruction booklet, and beginning with the uniform
spacing between the track connections and continual verification of the relative
roundness and levelness of the pool, the final assembly of your pool's framework should be
smooth as all of the pieces are uniform in shape and dimension.
Assemble all remaining posts, rails, etc. loosely at first until all are attached.
Plumb the posts as squarely as possible before tightening the screws and bolts completely.
Tighten screws and bolts to rails.
- Align plates and attach top seats.
Attach the cover caps and decorative trim-work as applies. Tighten screws and bolts to rails.
- Install skimmer and return. Hook up filtration system.
Follow all manufacturer's instruction booklets for proper installation.
- Attach/post safety decals & warranty information.
It is generally required that you attach to the pool the safety and warning
decals and signs supplied by the manufacturer in accordance with the locations outlined
within the manufacturer's instruction manual. You should save all manuals, instruction
booklets, and product or warranty information for your pool and its associated products.
You will need them in the future.
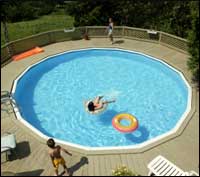
- Fill your pool and enjoy!!!
|


 We don't believe in wasting your time with bait and switch tactics or selling inferior products
like other above ground pool dealers.We only offer proven components that we know work and last.
With well over 20 years of above ground pool installation experience we know the difference.
We don't believe in wasting your time with bait and switch tactics or selling inferior products
like other above ground pool dealers.We only offer proven components that we know work and last.
With well over 20 years of above ground pool installation experience we know the difference.
 Offering 9 layer wall protection, In ground beaded style liner, 7 layer frame protection, liner loc
protective coping, quadrafold wall closure and the best wall strength available.
Offering 9 layer wall protection, In ground beaded style liner, 7 layer frame protection, liner loc
protective coping, quadrafold wall closure and the best wall strength available.  Careful consideration of pool size and yard placement provides years of fun in the sun!
 We offer the very latest in pool filter technology ensuring your pool water is clear and clean. We offer three types
of popular methods of filtration - Sand, Cartridge and Diatomaceous Earth (D. E.)
We offer the very latest in pool filter technology ensuring your pool water is clear and clean. We offer three types
of popular methods of filtration - Sand, Cartridge and Diatomaceous Earth (D. E.)